Woodworking joints may be both robust and elegant. Discover the history of these time-honored methods of joinery utilized by woodworkers worldwide.

Mortise-and-Tenon Joint
This is a generic term – a mortise is a pocket carved into a piece of wood, whereas a tenon is a positive portion on the end of another piece of wood that fits into the mortise.
The tenon shoulders, which are frequently cut at square 90-degree angles, sit on the face of the mortise, providing strength and structure and preventing the mortise from tipping or racking out of square.
There are dozens of variations, and the mortise-and-tenon joint is available in a variety of configurations. It might be rectangular, square, pinned, wedged, haunched, free, or cylindrical in shape.

Dovetail Joint
The dovetail joint, which is widely used on drawers, is the Holy Grail of woodworking joints. The wedge-shaped pins and tails are cut on non-separable mating components.
Although the dovetail is a beautiful and robust joint, it is one of the most difficult to execute. Dovetails can be cut by hand, using a mix of careful saw and chisel work, or with a variety of available router templates, assuring proper pin and tail alignment. In each scenario, meticulous arrangement and a patient eye for detail are required.
While partially blind or concealed dovetails exist, the majority of dovetails are open. That is because the joint is exquisite and demonstrates the maker's meticulous craftsmanship.

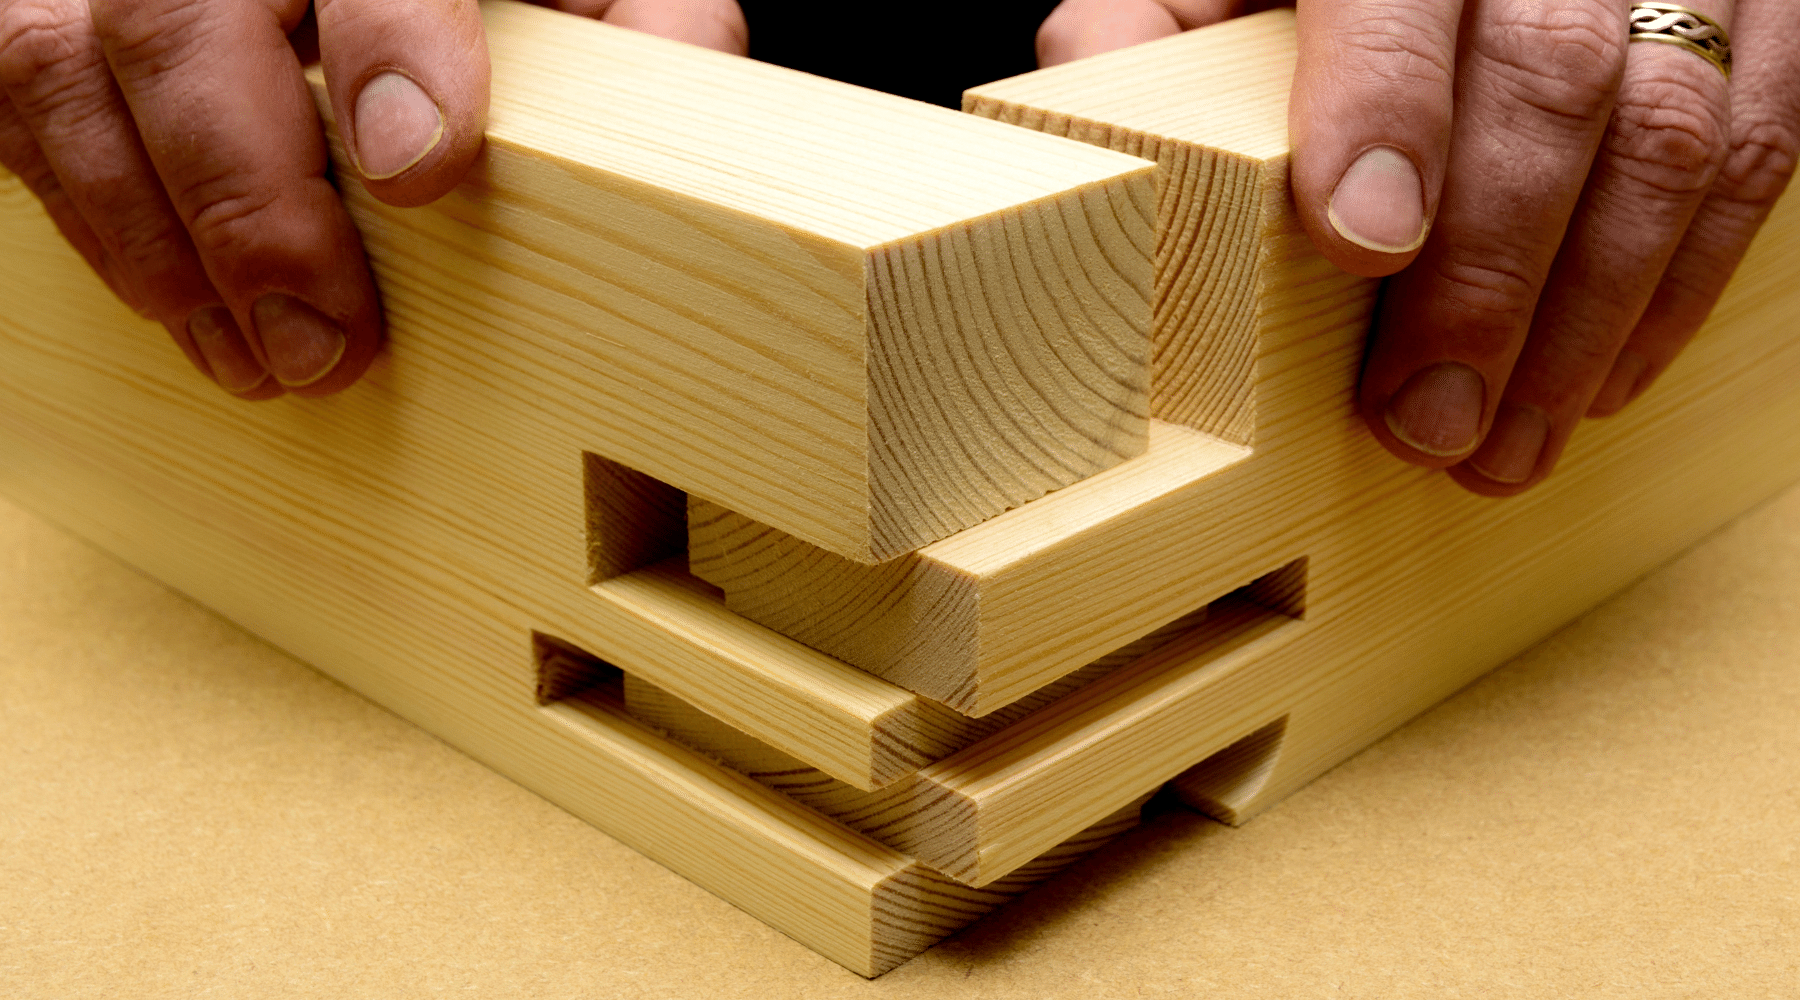
Box Joint
The box joint is considered the dovetail's younger, more agile sister. Consider two hands with straight fingers intertwined. This is a box joint, often known as a finger joint. While box and dovetail joints can be used interchangeably for the same structural purpose, the box junction is less elaborate and possibly easier to execute.
To create this neat connection, woodworkers use router templates or a stacked dado blade on the table saw. Once established, it may be produced efficiently.
Bridle Joint
The bridle joint, like the mortise-and-tenon joint, is cut to the entire width of the tenon. This joint is frequently utilized in bigger joining situations, such as work benches with enormous cross members or in the building of barn doors. Because of the vast glue surface area and relative simplicity of execution, woodworkers use the large, attractive bridle joint on large items.
The bridle joint is frequently used on corners, but it can also be paired with a T-bridle joint, which connects the ends of one piece to the center of the board. This joint is particularly lovely due to the contrast between the face and end grain, which draws attention to the craftsmanship.

Butt Joint
This straightforward junction is formed when one component butts or bumps end-grain against the long-grain face of another piece at a 90-degree angle. It's simple to perform because no additional length is required for tenons or equivalent mortises.
Simple butt joints, on the other hand, are brittle and should be reinforced. They can be doweled or screwed together, but gluing them together is insufficient. End grain absorbs glue, starving and weakening the joint. Additionally, the board butting up against the long grain swells and shrinks, compromising the glue's adherence.

Scarf Joint
Although this is a less common joint, it is nonetheless worth knowing. When longer pieces of wood are required than are available, the scarf joint, also known as an extender joint, comes to the rescue.
Consider your home's baseboards. Rather than butt-joining these pieces together (as described above), it is preferable to form a 45-degree angle on the end of a board along the height of the two pieces. The transition between the components becomes invisible at that point. This joint is often used in the construction of boats and canoes.
Joint on the Half-Lap
Each side of this joint (which is effectively a butt joint with a shoulder) takes only two cuts and some chisel cleanup. While the half-lap is not as strong as some other joints, it features substantial glue surfaces and a shoulder to aid square frames.
This straightforward connection provides both decoration and structure. For added structure, it is frequently cross-pinned with dowels across the face.

Dado Joint
The dado is a simple construction joint that is frequently used in cabinet and bookcase building. It is a groove or trench cut entirely across the grain that is used to hold another piece of wood.
Dadoes are used in the manufacture of solid wood and plywood and are cut with a router or a dado blade in a table saw. It's a unique blade arrangement in which numerous blades are stacked together to achieve a wide cut.
Not only is the dado structural, but it also makes it simple to put components of a shelf or cabinet. A halted dado joint maintains the uninterrupted edge of the traditional joint while maintaining the convenience and structure of the conventional joint.

Rabbet Joint
As with dadoes, rabbets are only visible on the outside of a piece of wood. It's the lip along the alternating edges of shiplap used on the backs of cabinets, or the inside lip of a frame that holds a pane of glass.
Occasionally, rabbets are utilized to accommodate a corresponding dado. Rabbet joints are not particularly robust by themselves and are frequently reinforced with screws, nails, or dowels.
Miter Joint/Picture-Frame Joint
Miter joints, alternatively referred to as picture frame joints, are usually invariably 45-degree cuts that meet at 90-degree angles. When completed properly, this lovely joint allows the wood grain to flow attractively around a box or frame.
While this joint is what gave the miter saw its name, doing it with untuned tools can be challenging. If a jig or tool set used to create 45-degree cuts is even 1/2-degree off, the error compounded over the eight joints, resulting in unattractive gaps. Prior to making clean miters, it is critical to test cut and align tools.
Additionally, the end grain on the joints means that glue is rarely sufficient. Cross grain reinforcement ornamental splines are added for aesthetics and structural stability.